This is Part 5 of an 8 part series in getting Azure IoT Edge setup with the Raspberry Pi.
You can read the other parts here…
Part 1 – Setting up Raspbian Buster
Part 2 – Creating an IoT Hub and Edge Device
Part 3 – Creating an Azure DevOps Organisation, Project, Settings, etc
Part 4 – Setting up the Azure IoT Edge Device Pi
Part 6 – Creating an Azure Container Registry
Part 7 – Download the Azure DevOps Project Source Code
Contents
In this post we’ll run through getting Raspbian Buster set up on two Raspberry Pi’s ready to get Azure IoT Edge up and running.
What we’ll be doing
1 – Connect to the IoT Edge Build Pi
2 – Install Essential Build Tools
3 – Install the Azure CLI
4 – Add Microsoft Sources
5 – Install the Moby Engine
6 – Workaround Raspbian Buster Incompatibility
7 – Edit Sources to Point at Stretch
8 – Revert to Libcurl3
9 – Cleanup Orphaned Packages
10 – Edit Sources to Point at Buster
11 – Install the IoT Edge Dev Tool
12 – Install the Azure DevOps Agent
13 – Configure the Azure DevOps Agent
What we’ll be doing
In the previous post, we setup our IoT Edge Device Pi with Docker and the IoT Edge Runtime.
In this post we ‘ll get the IoT Edge Build Device Pi setup so that we can use it to build ARM32 Modules that will run on the IoT Edge Device Pi.
The Azure DevOps service is unable to build ARM32 Modules, and as such, anything that DevOps build natively won’t run on your Pi which runs 32bit Raspbian, but will instead generate an error.
We’ll also need to work around some incompatibilities between the Stretch Release of the IoT Agent and the current Buster Release too.
1: Connect to the IoT Edge Build Pi
For this section you’ll again need PuTTY. If you’ve not already got it (how did you get this far?), then you can grab a copy here…
Next, launch PuTTY and enter “iotedgebuild” in the “Host Name (or IP address)” box.
Next, enter a friendly name for the connection such as “IoT Edge Build” in the “Saved Sessions” Box. This way you’ll be able to return to your session at a later date.
Finally, hit the “Open” button to begin connecting to the IoT Edge Build Pi.
PuTTY will likely prompt you with a “PuTTY Security Alert” asking you to accept a certificate. Hit the “Yes” button to accept the certificate and connect to the Pi.
Enter “pi” as the username at the “login as:” prompt and hit enter.
Enter “raspberry” (all in lower case) at the “pi@iotedgebuild’s password:” prompt and hit enter to finish connecting to the IoT Edge Device Pi.
2: Installing Essential Build Tools
Next up we need to install a heap of essential build tooling that will allow our Build Pi to connect to Azure DevOps and build Module Images.
We’ll install;
- python3-setuptools – Extensions to the python-distutils for large or complex distributions.
- python3-dev – Header files, a static library and development tools for building Python modules, extending the Python interpreter or embedding Python in applications.
- build-essential – This package contains an informational list of packages which are considered essential for building Debian packages. This package also depends on the packages on that list, to make it easy to have the build-essential packages installed.
- tk-dev – Tk is a cross-platform graphical toolkit which provides the Motif look-and-feel and is implemented using the Tcl scripting language.
- libncurses5-dev – The ncurses library routines are a terminal-independent method of updating character screens with reasonable optimization.
- libncursesw5-dev – See above
- libreadline6-dev – The GNU readline library aids in the consistency of user interface across discrete programs that need to provide a command line interface.
- libdb5.3-dev – This is the development package which contains headers and static libraries for the Berkeley v5.3 database library.
- libgdbm-dev – GNU dbm (‘gdbm’) is a library of database functions that use extendible hashing and works similarly to the standard UNIX ‘dbm’ functions.
- libsqlite3-dev – SQLite is a C library that implements an SQL database engine. Programs that link with the SQLite library can have SQL database access without running a separate RDBMS process.
- libssl-dev – This package is part of the OpenSSL project’s implementation of the SSL and TLS cryptographic protocols for secure communication over the Internet.
- libbz2-dev – Static libraries and include files for the bzip2 compressor library.
- libexpat1-dev – This package contains the header file and development libraries of expat, the C library for parsing XML.
- liblzma-dev – XZ is the successor to the Lempel-Ziv/Markov-chain Algorithm compression format, which provides memory-hungry but powerful compression (often better than bzip2) and fast, easy decompression.
- zlib1g-dev – zlib is a library implementing the deflate compression method found in gzip and PKZIP. This package includes the development support files.
- libffi-dev – This package contains the headers and static library files necessary for building programs which use libffi.
- libxerces-c3.1 – (Stretch) – Xerces-C++ is a validating XML parser written in a portable subset of C++
- libcurl3 – (Stretch) – libcurl is an easy-to-use client-side URL transfer library, supporting DICT, FILE, FTP, FTPS, GOPHER, HTTP, HTTPS, IMAP, IMAPS, LDAP, LDAPS, POP3, POP3S, RTMP, RTSP, SCP, SFTP, SMTP, SMTPS, TELNET and TFTP.
Enter the following command in the PuTTY terminal;
sudo apt-get install python3-setuptools python3-dev build-essential tk-dev libncurses5-dev libncursesw5-dev libreadline6-dev libdb5.3-dev libgdbm-dev libsqlite3-dev libssl-dev libbz2-dev libexpat1-dev liblzma-dev zlib1g-dev libffi-dev -y && sudo easy_install3 pip

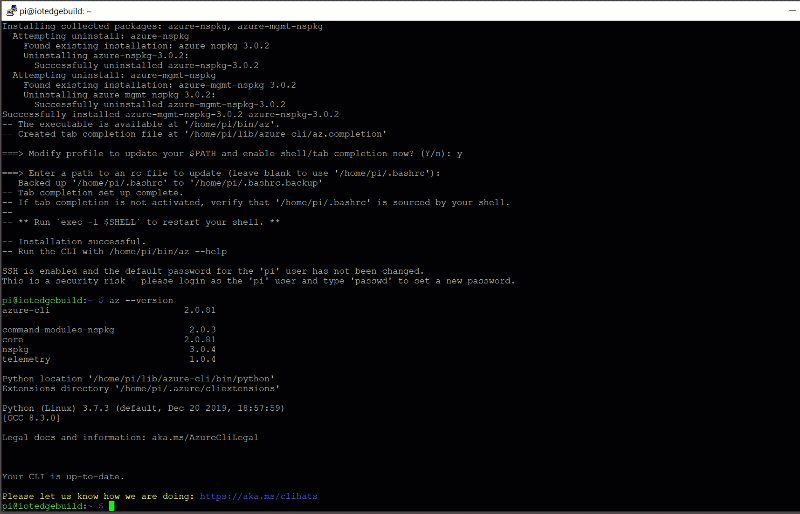
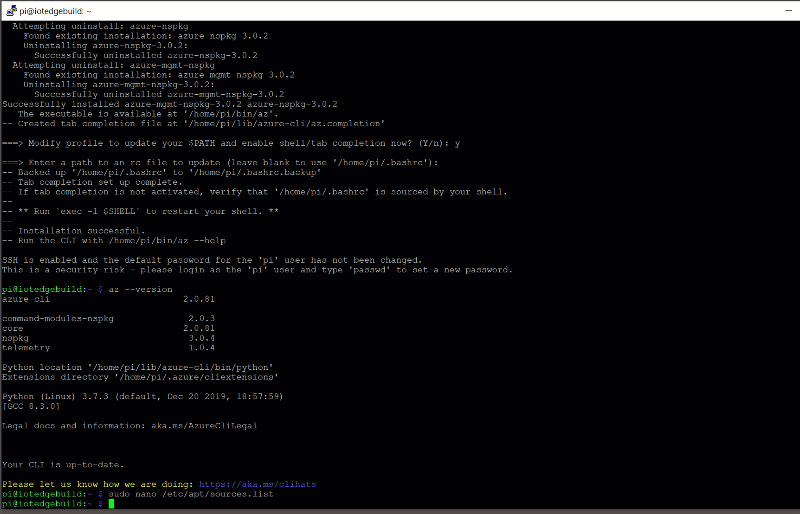
3: Install the Azure CLI
We now need to install the Azure CLI to be able to interact with Azure.
Run the following command;
curl -L https://aka.ms/InstallAzureCli | bash && exec -l $SHELL

You can check that the Azure CLI is downloaded correctly by running the following command;
az --version

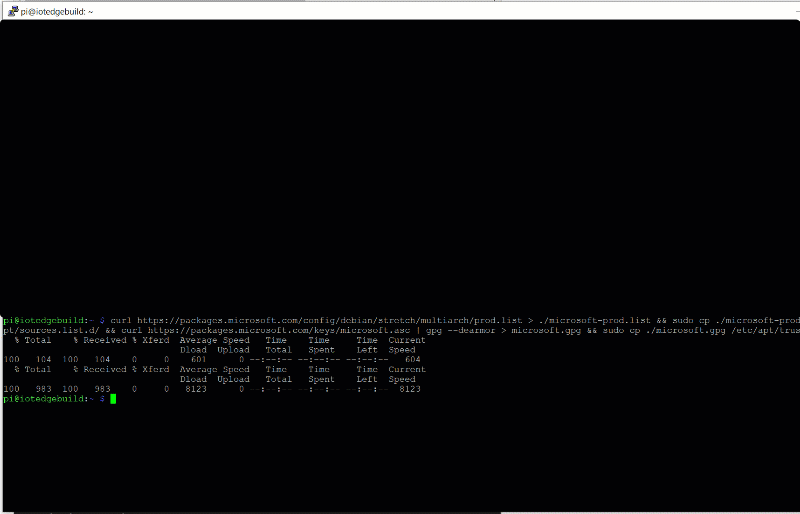
4: Add Microsoft Sources
We now need to add Microsoft Sources to our Package list so we can install some requirements.
Run the following command;
curl https://packages.microsoft.com/config/debian/stretch/multiarch/prod.list > ./microsoft-prod.list && sudo cp ./microsoft-prod.list /etc/apt/sources.list.d/ && curl https://packages.microsoft.com/keys/microsoft.asc | gpg --dearmor > microsoft.gpg && sudo cp ./microsoft.gpg /etc/apt/trusted.gpg.d/
5: Install the Moby Engine
Next we install the Moby Engine. In order for our Edge Build Pi to build Modules, the Edge Agent makes use of Moby, which is essentially Docker.
Install the Moby Engine with the following command;
sudo apt-get update && sudo apt-get install moby-engine && sudo apt-get install moby-cli
6: Workaround Raspbian Buster Incompatibility
There’s an incompatibility currently with the libcurl4 library bundled along with Raspbian Buster which breaks the DevOps Agent Install which relies on libcurl3.
In order to workaround this we’re going to switch our apt sources list to point at the Raspbain Stretch source. We’ll then grab libxerces-c3.1 and libcurl3.
Finally we’ll switch back to the Raspbian Buster before continuing with our installation.
7: Edit Sources to point at Stretch
We now need to point our apt sources list at the Raspbian Stretch list so we can grab libcurl3.
We’ll use nano to edit the sources list. Execute the following command edit the sources list;
sudo nano /etc/apt/sources.list
On the first line is the current sources URL;

Replace the “buster” reference with “stretch“. Hit “ctrl+x” and press “y” to save the file;
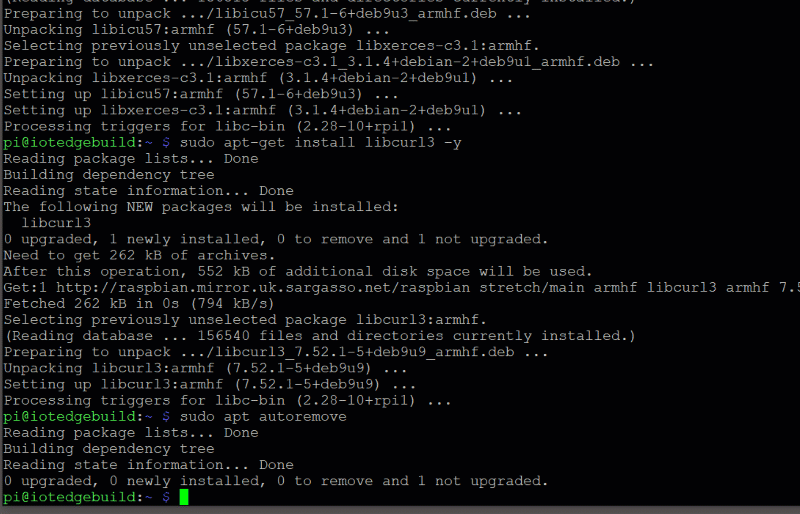
8: Revert to Libcurl3
Now that we’re pointing at the Raspbian Stretch sources, we can update the apt list using;
sudo apt-get update
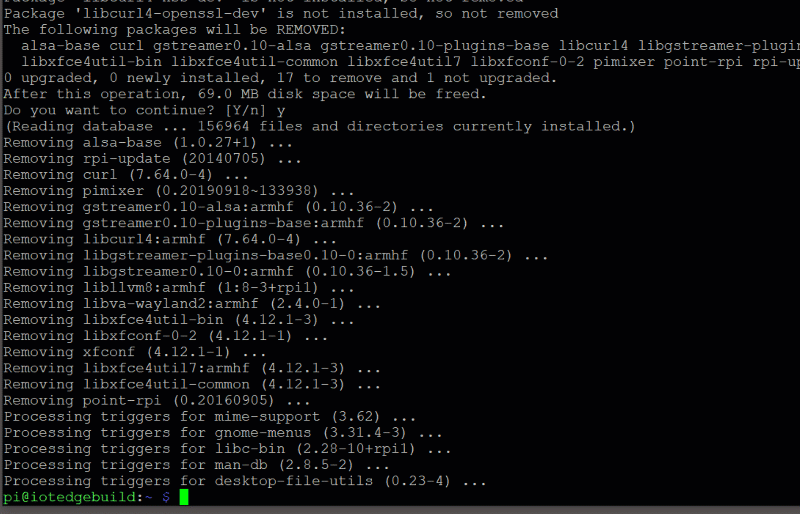
Next, we need to remove the affect libcurl4 package using;
sudo apt-get remove --auto-remove libcurl4*

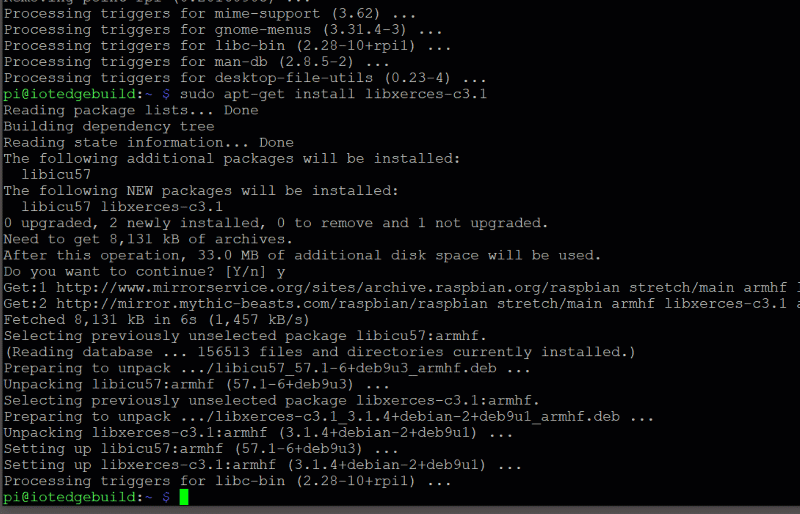
Next we need to install the libxerces package. This package allows the Azure Build Agent to read and write XML. Run the following command;
sudo apt-get install libxerces-c3.1 -y
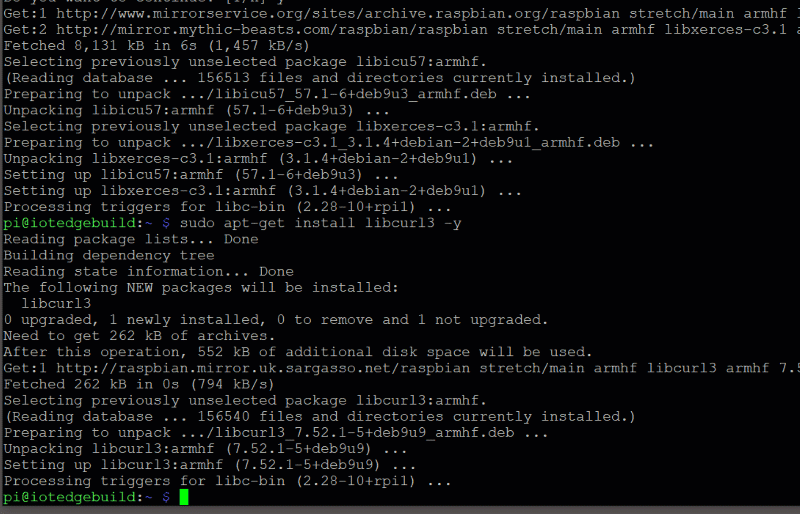
We can now install libcurl3. Run the following command;
sudo apt-get install lubcurl3 -y
9: Cleanup Orphaned Packages
As we’ve been removing packages, it’s a good idea to cleanup the unused Packages… Run the following command;
sudo apt remove
10: Edit Sources to Point at Buster
We’re now ready to return to the Buster Package Source.
Edit the Sources List again using;
sudo nano /etc/apt/sources.list
Revert the “stretch” source to “buster“. Exit and save the file with “ctrl+x” then press “y” to save.
Finally, we can make sure our package lists are up to date with Buster again by running;
sudo apt-get update
11: Install the IoT Edge Dev Tool
We now need to install the IoT Edge Dev Tool. This tool will allow our Build Pi to build IoT Edge Modules.
Install the IoT Edge Dev Tool using the following command;
sudo pip3 install -U iotedgedev

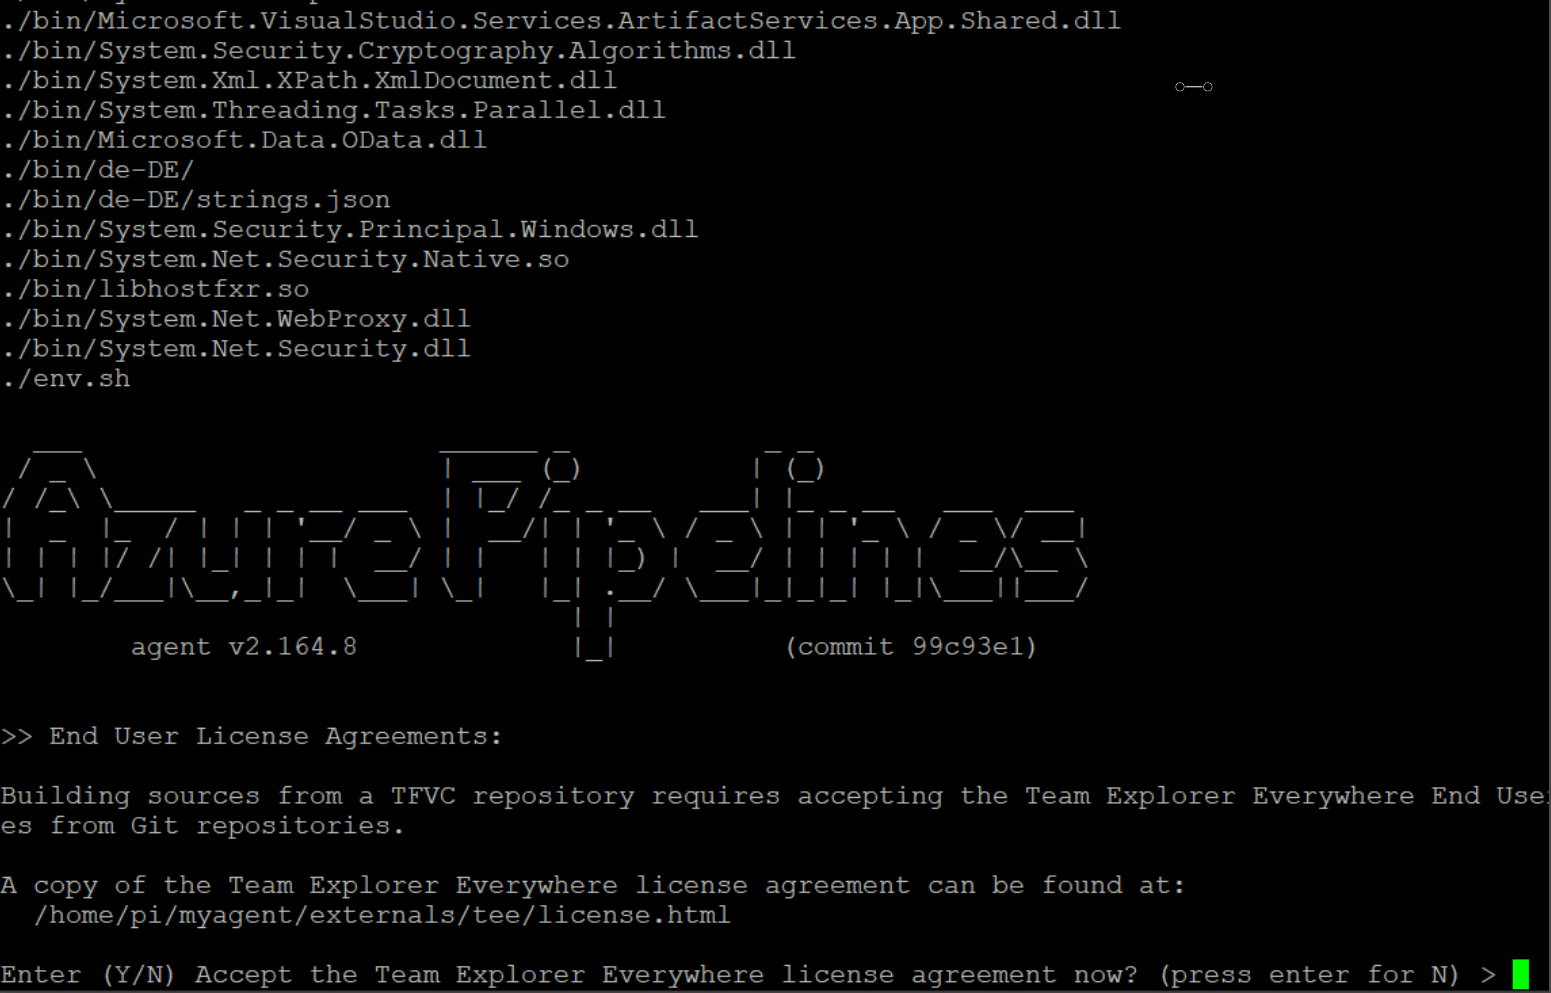
12: Install the Azure DevOps Agent
Our final step is to install the Azure DevOps agent. This will allow Azure DevOps and our Build Pi to communicate. This will co-ordinate using the Build Pi to build the IoT Edge Modules and deliver them back to the Azure DevOps pipeline.
Firstly, make sure you are in your home directory;
cd ~
Next download and install the Azure DevOps Agent with;
wget https://vstsagentpackage.azureedge.net/agent/2.164.8/vsts-agent-linux-arm-2.164.8.tar.gz && mkdir myagent && cd myagent && tar zxvf ../vsts-agent-linux-arm-2.164.8.tar.gz && ./config.sh && sudo ./svc.sh install root && sudo ./svc.sh start && cd ..
Here we’re actually doing a few things at once…
Firstly we’re grabbing the Azure DevOps Agent Package (VSTS is the predecessor of Azure DevOps);
wget https://vstsagentpackage.azureedge.net/agent/2.164.8/vsts-agent-linux-arm-2.164.8.tar.gz
Next we’re creating and entering a directory called “myagent”, where we’ll store the executable files;
mkdir myagent
cd myagent
Next we decompress the file we downloaded to extract all of the executable files;
tar zxvf ../vsts-agent-linux-arm-2.164.8.tar.gz
Next we configure the Azure DevOps environment by running the “config.sh” shell script;
./config.sh
Next we install the Azure DevOps Agent Service to run as the root user;
sudo ./svc.sh install root
Next we start the Azure DevOps Agent Service;
sudo ./svc.sh start
Finally we back out of the agent directory, back to our home directory;
cd ..

13: Configure the Azure DevOps Agent
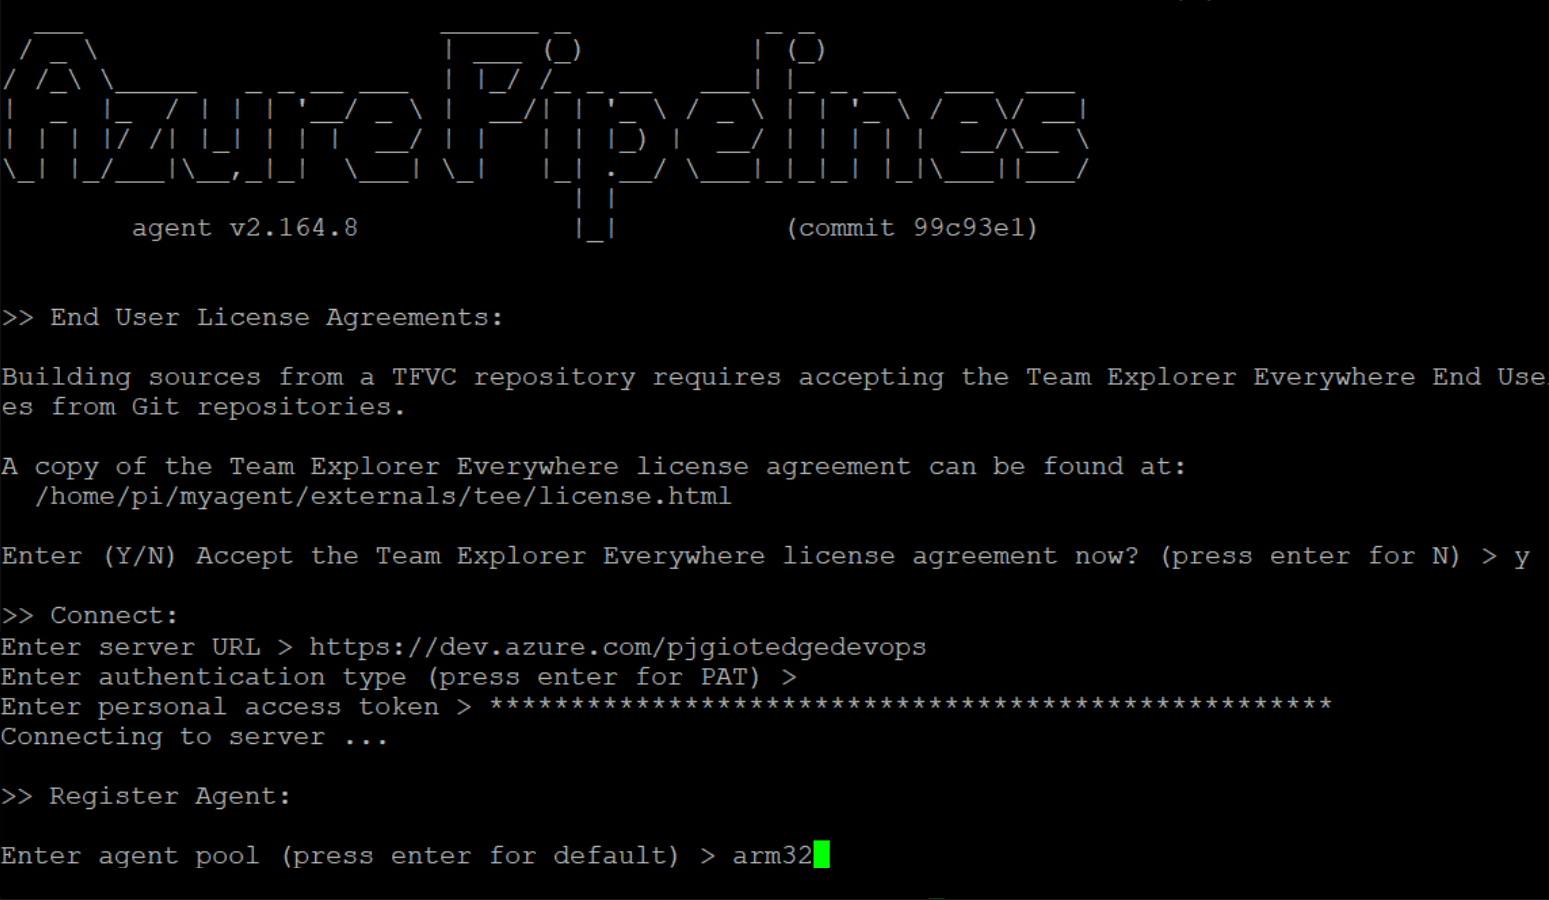
Once the Azure DevOps Agent is finished downloading and installing it will automatically launch the config tool to let us setup the connection to the Azure DevOps pipeline we created.
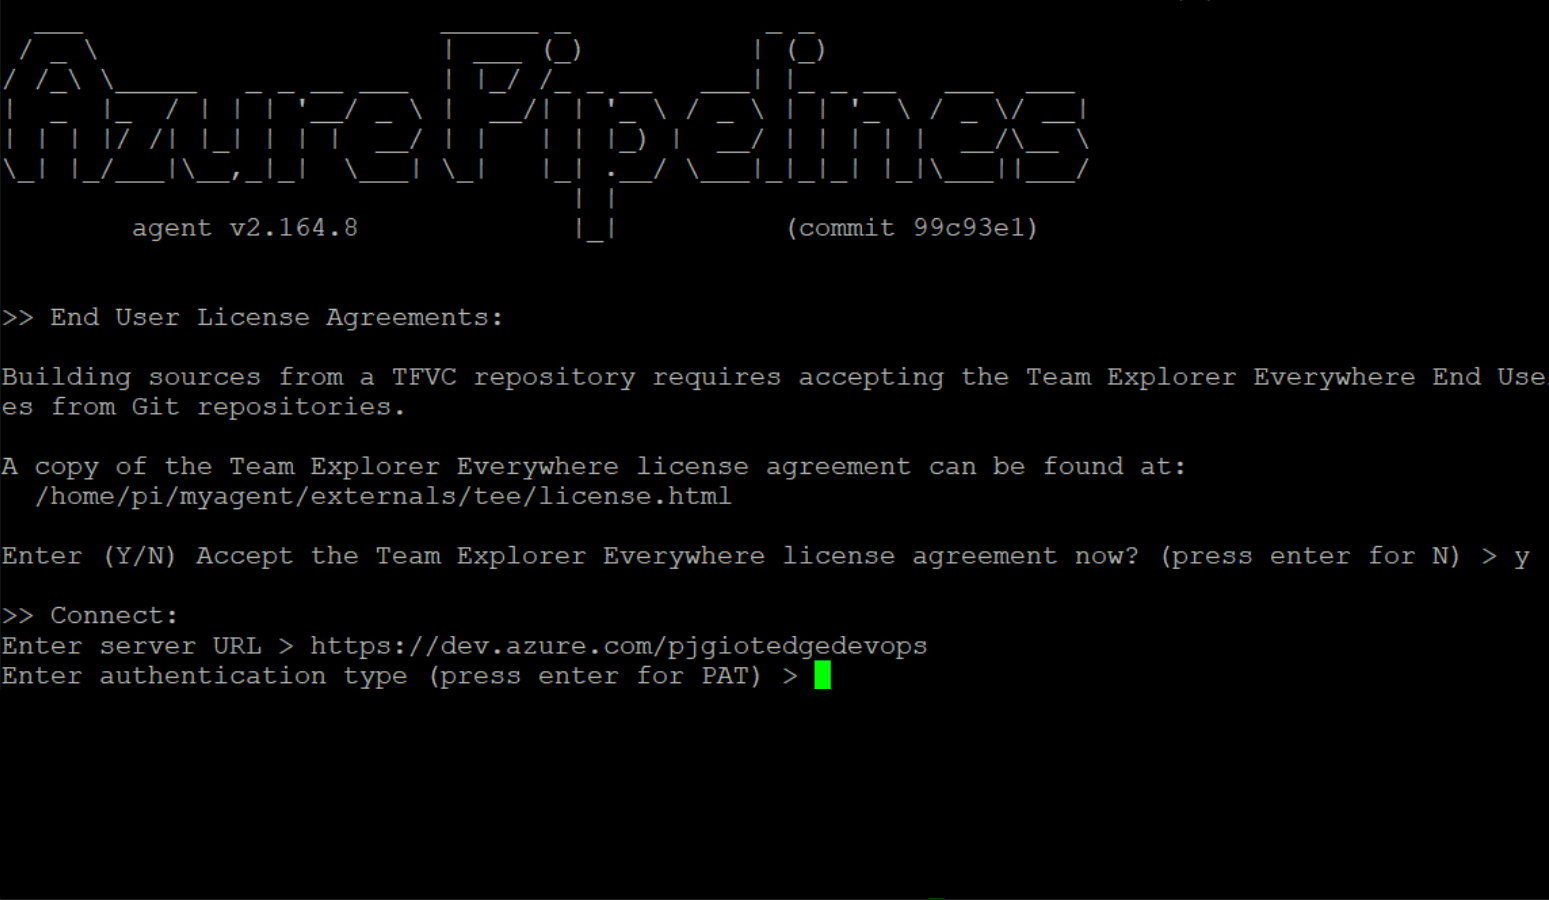
The first question you will be asked during the installation will be to accept the terms and conditions.
Press the “y” key and hit enter to accept the terms;
Next you’ll need to enter the address to your Azure DevOps Organisation. You can grab that from your Azure DevOps Organisation’s URL.
Go to https://azure.microsoft.com/en-us/services/devops/
His the “Sign in to Azure DevOps” link on the left hand side of the page. Follow through the sign in process and you should be redirected to your Azure DevOps Home Page;

If it’s not already selected, click on your IoT Edge DevOps Organisation.
Copy the URL in the address bar and return to your PuTTY session. Paste the value in by right clicking anywhere on the window;

Next we need to choose “PAT” or “Personal Access Token” as the method of authentication. Simply press enter at this stage to accept the default of PAT.
Next we need to paste in our Personal Access Token. We saved this token earlier when we created the “iotedgebuild” Personal Access Token. Grab the token and past it into PuTTY.
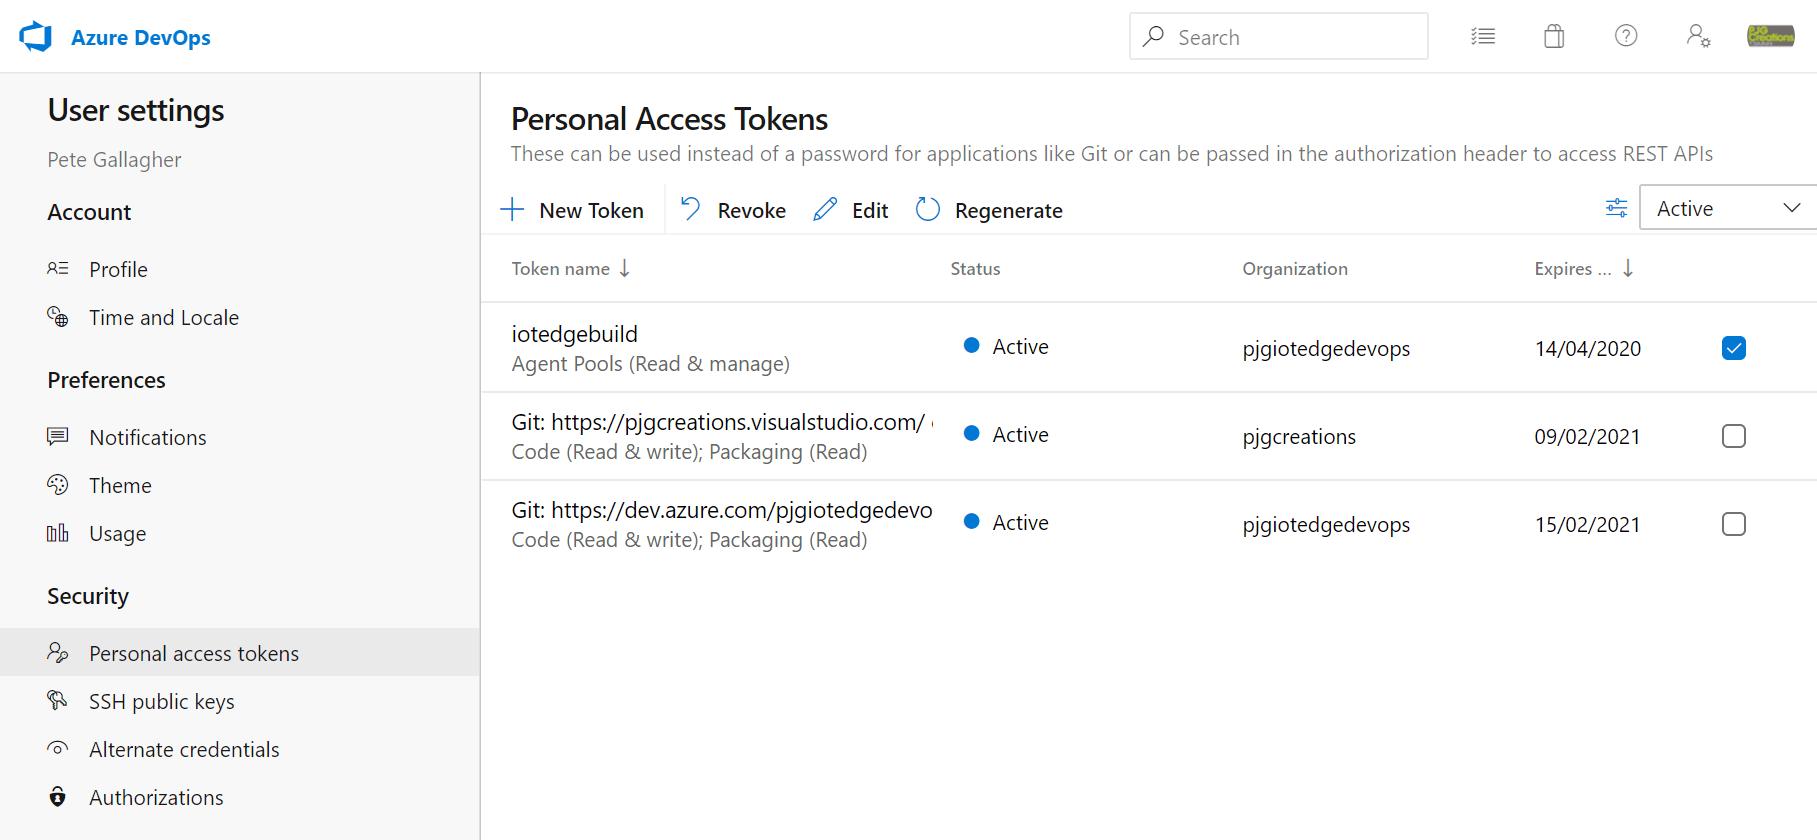
If you’ve somehow lost the token, we can regenerate it from our Organisation User Settings.
Return to your Organisation Dashboard. Hit the User Settings Icon in the top right hand corner of the screen to show the User Settings Menu;
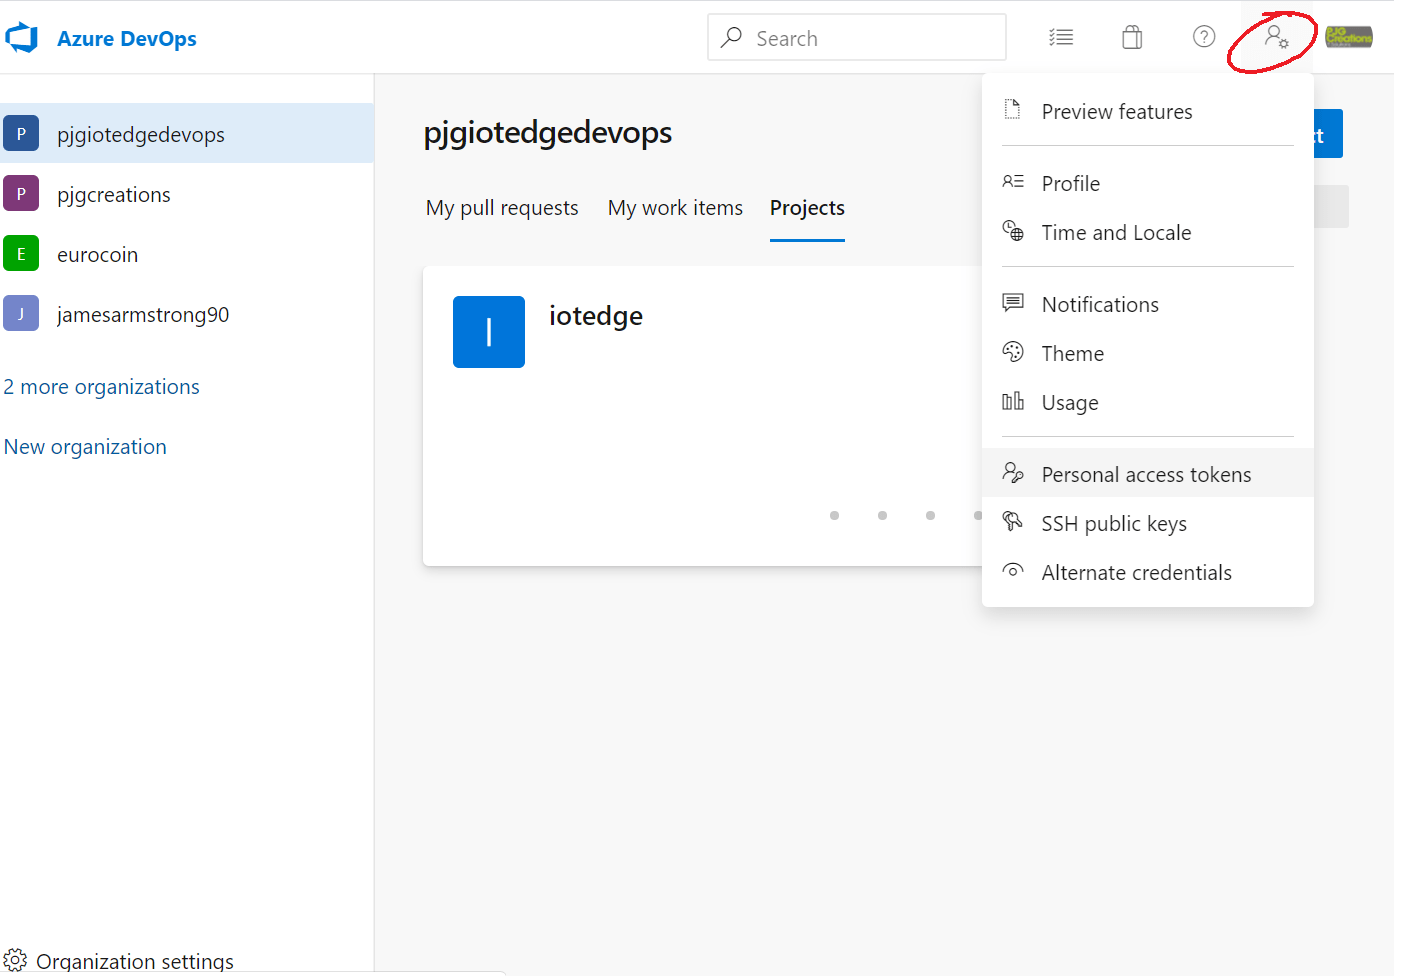
Hit the “Personal access tokens” menu item to be shown the list of Personal Access Tokens for your Organisation;

Click on the “iotedgebuild” token we created earlier to show the menu options;
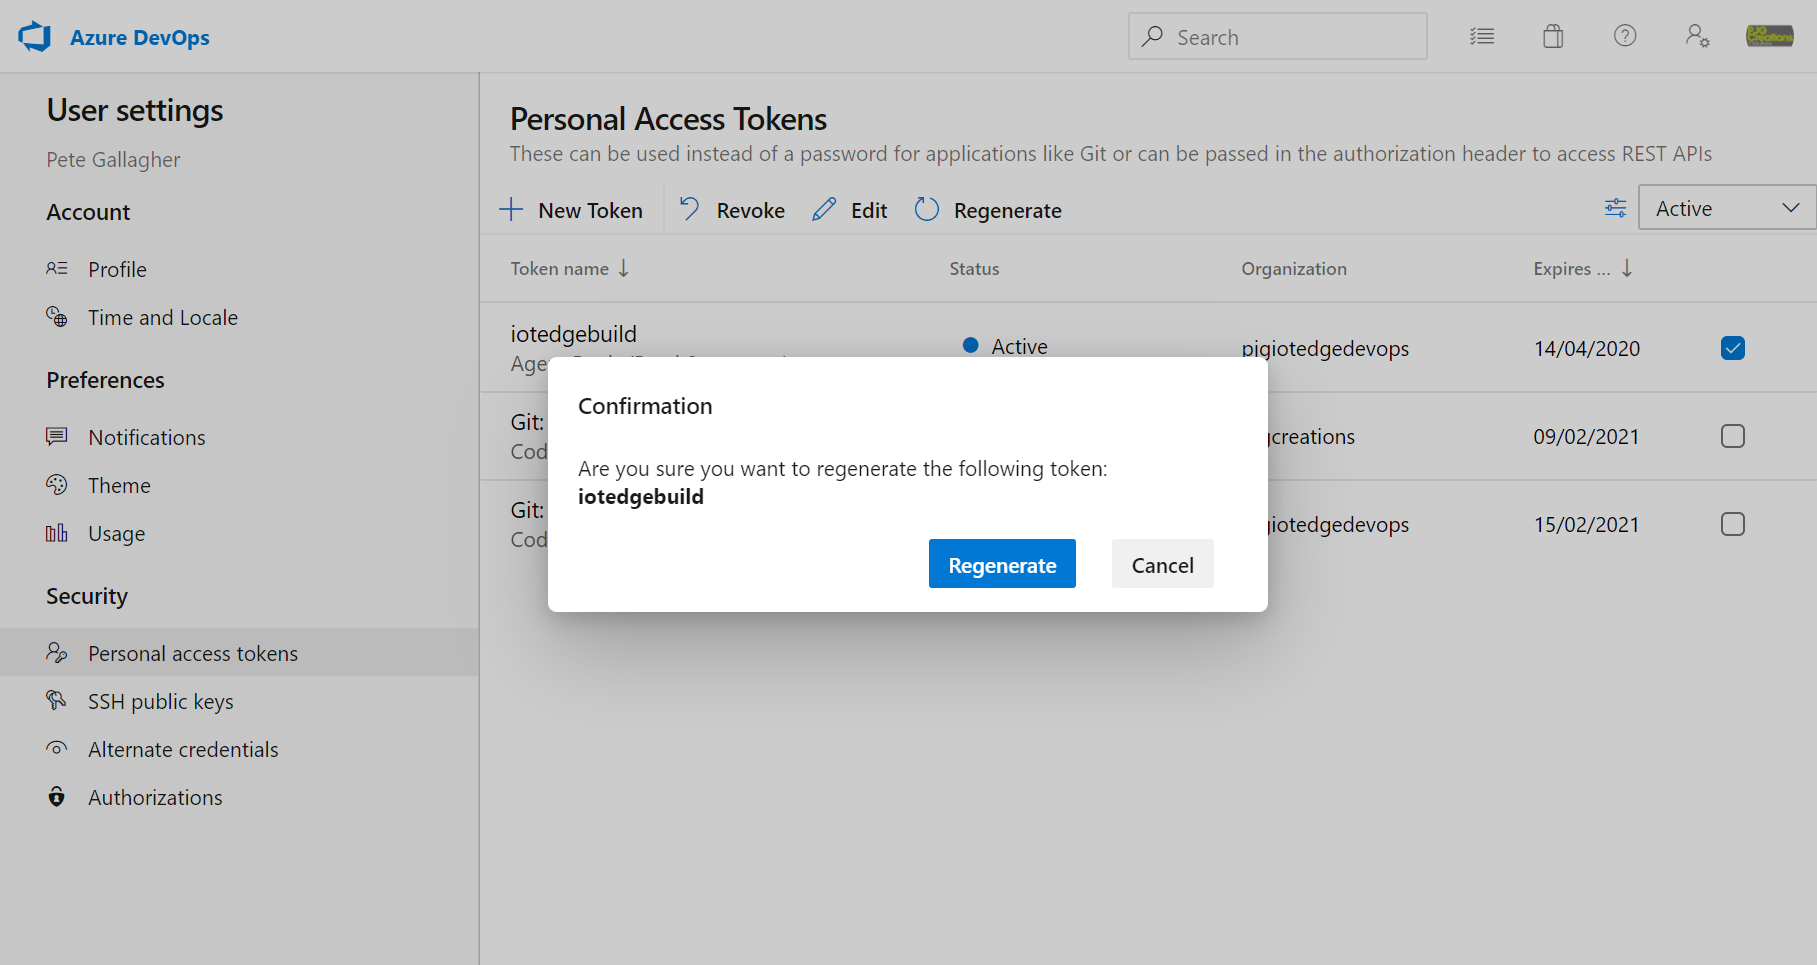
Click the regenerate Menu Item and press the Regenerate Button to create a new Personal Access Token.
Next we need to set which Agent Pool the Agent on our Build Pi will be associated with.
Enter “arm32” at the “Agent Pool” prompt and press Enter to confirm;
You’ll then be prompted for an “Agent Name”, you can accept the default of “iotedgebuild” by simply pressing Enter to confirm;
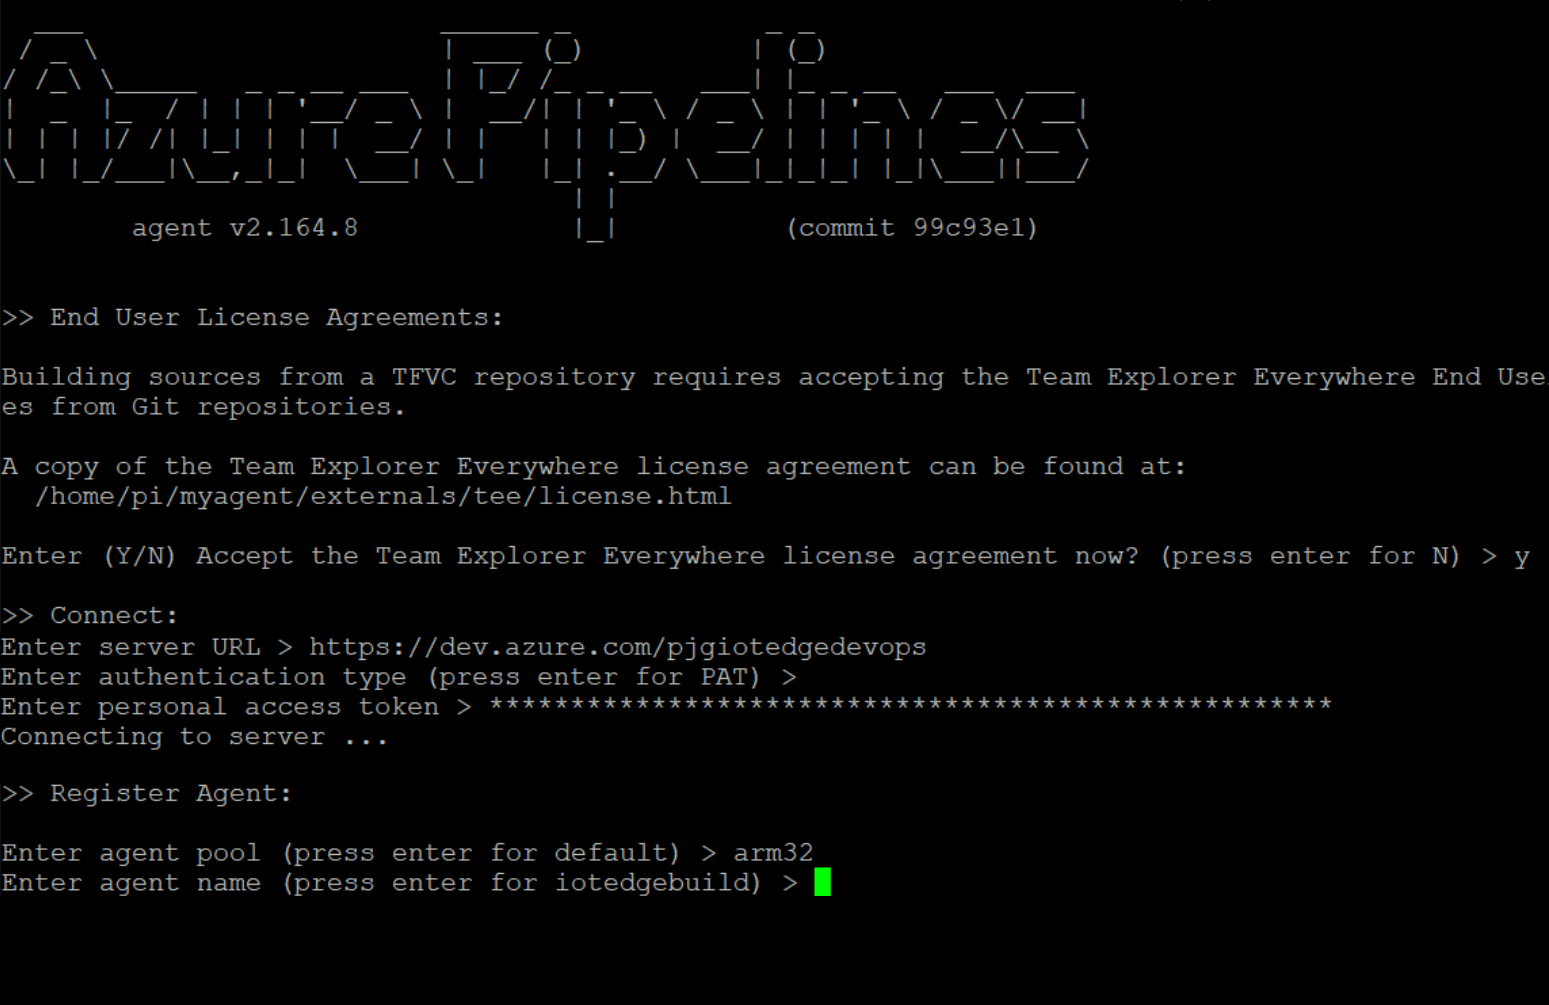
Next you’ll be prompted for a location to store the build files while they’re being created. At the “Enter work folder” prompt press enter again to accept the default of “_work“;
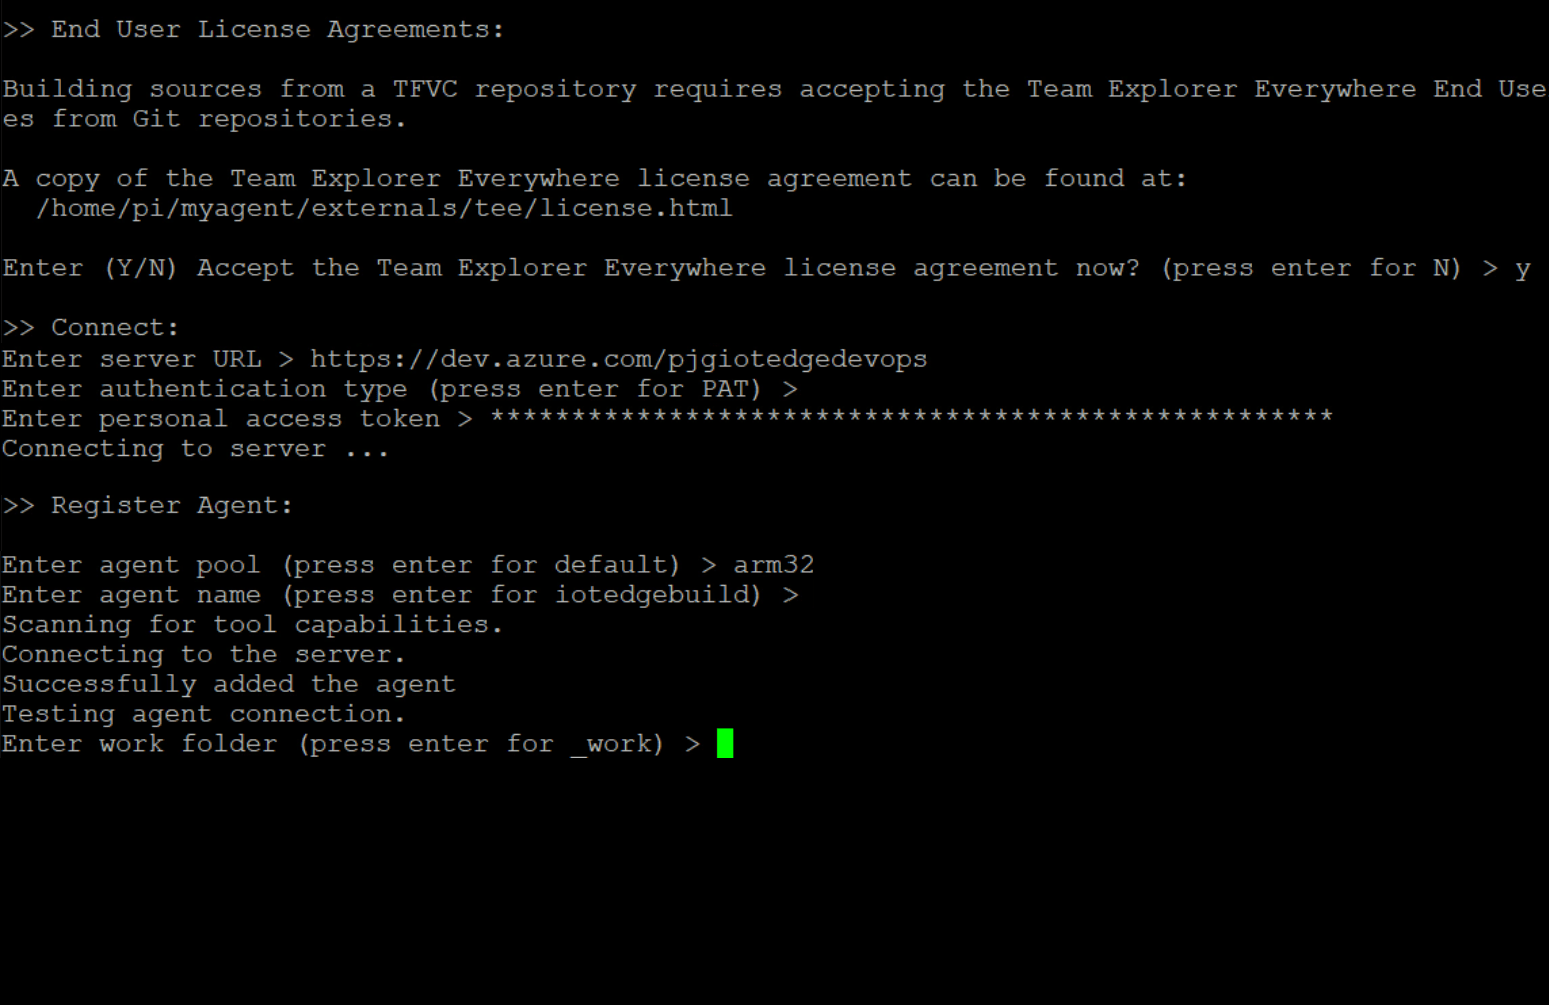
After the last bit of text scrolls by your Azure DevOps Agent is all setup!

To be continued…
In this post we got our IoT Edge Build Pi setup ready to be able to build ARM32 IoT Edge Modules.
In the next post we’ll create an Azure Registry to house our IoT Edge Modules.
Creating an Azure IoT Edge Registry >